The eighth dinner party was the night after the day the shipping
people (what do you call them officially? shippers?) came to pack up all my
kitchen things. By necessity, anything I cooked from that point on had to be
simple, so a simple dinner it was.
I did, however, manage to impress myself endlessly by making
a cake despite having no mixing bowls, no measuring cups or spoons, no scale,
and to make it just that little bit more exciting, no recipe. I just tossed
random amounts of things into an old bunged-up pot to melt, added still-random
quantities of dry ingredients and stirred. Ta-da: cake batter. Poured into an
old, battered pan on top of leftover poached pears. Miraculously, it rose and
was edible, even very good, although of course I have no idea how much of what
I used so there is no recipe.
 |
| Recipe-less cake |
Anyway, the menu:
Cheese plate (insanely good taleggio and port salut, a gift)
with crostini made with homemade bread (a leftover from my weekend baking
escapade)
Oven-grilled beef fillet with chimichurri and sliced avocado
Smoky, spicy sweet potato wedges
Steamed greens – a mix of broccoli and green beans
Upside-down pear and ginger cake
Even though it would be nice to have the cake recipe to
share, the chimichurri is really what stood out for me. The piece of fillet we
had was on the small side for four people, and I got the idea in my head to
stretch it by layering the cooked, sliced fillet with avocado slices. A red
wine sauce or pepper sauce probably wouldn’t work well with the avocado, I
thought; I wanted something light and fresh, and preferably not hot.
Chimichurri seemed liked a good bet.
I’d never made chimichurri, so I scanned a few recipes to
get the basic idea and then went ahead on my own. I thought it would require
some effort, since I’m lazy and generally make similar kinds of sauces in my
food processor which was packed and hopefully on a boat to Singapore. In the
end, it was the simplest thing and something I’ll definitely make often. The
finished fillet-avocado-chimichurri dish was probably my favourite thing I’ve
made in months.
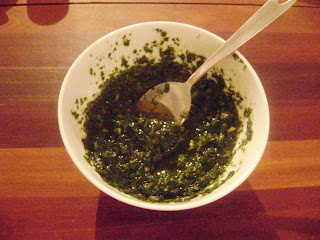 |
| Bowl of chimichurri |
Chimichurri
Makes about 1 cup
I made this a couple
of hours before using it, and kept it at room temperature. I’m sure it would
keep, covered and refrigerated, for a few days, although the garlic might
become more pronounced with time.
2 big handfuls flat leaf parsley
1 big handful picked oregano leaves
2 small cloves garlic, peeled and chopped
½ c olive oil, approximately
½ tsp salt, approximately
¼ tsp chili powder (or less, a pinch, if you don’t like
things too hot)
1 tsp red vinegar, approximately
Place the chopped garlic, parsley and oregano on a chopping
board, making a big pile. Using a sharp knife, start chopping, working from top
to bottom and side to side so you get to all the bits. Keep chopping until the
herbs are very well chopped but still have some texture – the finished product
isn’t meant to be smooth.
Scrape the chopped herbs and garlic into a bowl and add half
of each of the remaining ingredients. Stir well and taste, then decide if you
think the sauce needs the moisture from the remaining olive oil, and the
seasoning from the remaining salt, chili powder and vinegar. Add and adjust as
you see fit, tasting as you go.
This is a very strongly flavoured sauce, so however you use
it, a little goes a long way.
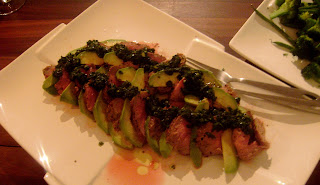 |
| Plated main dish |
And here are bonus instructions for assembling the main dish
I served:
Beef fillet with
avocado and chimichurri
1 x recipe chimichurri
1 beef fillet, as much as you need for the number of guests (as I mentioned, we used one that was a
little small for the number of guest, but worked perfectly presented this way,
so it’s a good recipe to stretch your meat if you need to)
Salt
Pepper
Olive oil
1 avocado for every four guests
Make the chimichurri first, and set aside.
Grill the beef fillet, simply rubbed with olive oil and seasoned
with black pepper and salt – use the oven’s grill, a stove-top griddle pan,
braai it, whatever you like. Our griddle pan was packed and gone so I used the
oven grill and it worked perfectly.
When the fillet is cooked how you like and resting, peel the
avocado and cut it up into thinnish slices, about ½ cm thick. Slice the fillet
into 1cm thick pieces. Lay the fillet and avocado down on a platter in an
alternating pattern – 1 slice avocado, 1 slice fillet, repeat. Sprinkle with
salt (crunchy Maldon salt flakes, if you have them), pour any steak juices
over, and finally top with the chimichurri.
The mixture of meat juices and leftover bit of chimichurri
that’s left after all the meat and avocado has been eaten is delicious, so some
bread for mopping is nice to have on hand.


