Showing posts with label chocolate. Show all posts

Wednesday, August 15, 2012

Chocolate orange cake, and a bit of nostalgia

We are in Singapore. I have eaten many notable things, despite only being here for just over 24 hours, and I have many thoughts. But first, some nostalgic pictures from our last week in South Africa, spent both in Cape Town and in Pretoria.

Mountains!

One of the views on one of our favourite
running routes in Cape Town

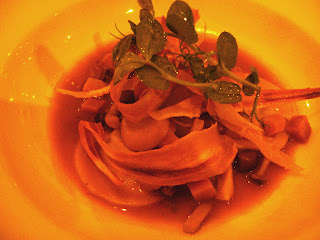
We ate lots of delicious food in the last week, including this
springbok ravioli dish at Bizerca Bistro

And we drank lots of wine,
like this pinot noir flight at French Toast

Cake and wine at the end of a family braai

That last photo is of a chocolate-orange cake I made for dessert at a family braai; chocolate with orange is one of my mom's favourite flavour combinations. I winged it, being at my mom’s house without recipes and my usual implements, but it turned out well enough that I think it should be made again.

Chocolate orange cake
Makes one large, high cake, or two layers for a layer cake
I had only one cake pan, so I baked the cake as a single layer, sliced it in half and filled it with marmalade. Two thinner layers would probably be easier, although you’d have to reduce the baking time.
When the cake was baked, I decided against covering it with frosting or icing of any kind. But I was afraid it would be dry without a topping, so I both soaked it in a flavoured sugar syrup and filled it with marmalade. It was delicious and I wouldn’t make it without the syrup, although you could add a chocolate frosting or ganache topping to make it richer and fancier if you like.

Batter:
½ c butter
1 c golden sugar
Zest and juice of 1 large orange
3 eggs
1 ¼ c flour
½ c cocoa powder
1 tsp salt
1 ½ tsp baking soda
1 tbsp balsamic vinegar
¼ c milk, plus more if needed

Syrup:
Juice of 1 large orange, plus a few strips of orange peel
¾ c water
½ c sugar
Preheat the oven to 165 C. Butter a large cake pan and line with baking paper, then butter again and dust with cocoa powder. Set aside.
In a large bowl, cream the butter, sugar and orange zest until light and fluffy. Add the eggs one by one, beating well after each addition; the mixture might start to split just a little, which is fine.
Sift the flour, cocoa powder, salt and baking soda into the butter mixture and add the orange juice, balsamic vinegar and milk. Stir until just combined. If the batter drops off the mixing spoon easily at this point, you’re done; if it seems thicker, add a bit more milk and mix again.
Scrape the batter into the prepared pan and bake for  approximately 45 minutes, or until a toothpick inserted into the centre comes out clean.
While the cake bakes, place all of the syrup ingredients in a small pot and bring to the boil. Boil for about five minutes and then remove from the heat. Remove the orange peel.
When the cake is baked and has cooled for five minutes, poke it all over with a sharp knife or a fork. Make sure you get to most of the cake’s surface. Pour the syrup over the cake, distributing it as evenly as you can.
Cool the cake further to room temperature, then invert onto a plate and fill and decorate as desired. Like I said, I just cut it in half, spread a lot of marmalade in between the two layers, and topped the cake with sliced kumquats and strawberries.

Wednesday, August 1, 2012

Dinner party number ten


This dinner party, in fact another Sunday lunch, was the very last meal with friends in our flat before we moved out to stay in a friend’s house for our last few days in Cape Town. I had thought ahead and frozen the leftover roast chicken from the previous weekend’s dinner party, as well as the leftover pastry from the pumpkin pie. (I have a complex about not having enough food to feed people, whether they’re guests or just my husband and I. The result is that I inevitably make far too much food. I take out four potatoes knowing that they’ll be enough, but then the doubt starts and I take out another one. And halfway through peeling, I’ll whip out a final sixth potato, just to be sure. Result: leftovers!)

But I digress. Leftover roast chicken and leftover pastry, combined with a quick creamy white wine sauce and some roasted root vegetables, leaves you with a creamy roast chicken and root vegetable pie. Add a salad and it’s a comforting, filling lunch.

So, the menu:
Creamy roast chicken and root vegetable pie
Spinach salad with avocado

Cappuccino bars

I was going to make another batch of brownies for dessert – they’re quick and easy and I know they’re good. But then I happened upon a recipe and accompanying pretty picture for glazed, chocolate-y cappuccino bars. I am a slave to pretty pictures of baked goods, so I decided: lack of baking implements be damned, I’m going to make these things. I had to become a little creative in the process given my single giant catering-size mixing bowl, one wonky wooden spoon and bent, charred baking slide, but the bars turned out anyway. They’re good, but they are incredibly rich; do cut them into small squares.


Cappuccino bars
Makes about 30 small squares

Dough:
1 c softened butter
1 c packed treacle sugar
1 tbsp instant espresso powder
¼ tsp finely ground espresso powder
1 tsp vanilla extract
2 ¼ c flour
½ tsp baking powder
½ tsp salt
2 c dark chocolate, chopped (I used Cadbury’s Bourneville)

Glaze:
2 tbsp milk
1 tbsp butter
¾ c icing sugar
¼ tsp cinnamon

Preheat the oven to 190 C. Line a rimmed cookie sheet/baking slide with baking parchment.

Cream the butter, sugar, coffee powder and grounds, and vanilla. Add the flour, baking powder and salt, and mix – the dough will be crumbly, which is all as it should be. Add the chopped chocolate and mix.

Dump the dough onto the lined baking slide and press it down into a smooth, solid sheet, using a rolling pin to smooth the top. If your baking slide is too big for the dough (you want it to be at least 1cm thick), the dough doesn’t have to go all the way to the edges; just be sure then to square off and trim the edges.

Bake for 10 to 15 minutes; watch them carefully as they burn easily. You don’t want them to get too dark.

Remove from the oven and let cool for 10 minutes. While they cool, melt all the ingredients for the glaze together in a small pot, and spread over the bars.

Cool to room temperature, until the glaze has set, and cut into small bars or squares.


Thursday, July 19, 2012

Dinner party number five


The fifth dinner party was the night after the fourth dinner party, and I was not up to cooking much. Also, there were a lot of people, too many to fit round our table, so by necessity it was going to be a living room, eat-on-your lap affair. Hence, the menu:

A variety of ordered-in pizzas

Homemade Maldon salt-sprinkled brownies, with ice cream
and caramel sauce

I was going to make a salad to go with the pizza, but after consultation it was decided that we all really just wanted pizza and brownies. We ordered the pizzas from a nondescript little place close to our flat that, in all our years in the neighbourhood, we’d never tried. Turns out they make perfectly thin-based, crispy, chewy and flavourful pizzas. That’ll teach us to judge a restaurant on its nondescript cover.

Brownies! I forgot to take photos on the night; this
is a recycled photo. Same recipe, though.


I used my favourite brownie recipe. It’s a slight adaptation of the old classic Hershey’s recipe: simple and basic, with no melted chocolate in the batter and no specialty extra-dark cocoa powder. There is a time and a place for expensive brownies laden with couverture chocolate, but I think there is even more time and place for these simpler brownies. My only concession to fancying them up is to add more salt to the batter, as well as sprinkling Maldon salt flakes on top before baking.

Again, a recycled photo - there are hazelnuts in these.
Most nuts are a good addition to these brownies.


Basic gooey brownies
Makes 9 to 12, depending on your pan size and how big you cut them

¾ cup cocoa powder
½ t baking soda
2/3 c butter, melted and divided
½ c boiling water
1 c packed treacle sugar
1 c sugar
2 eggs
1 1/3 c flour
1 tsp vanilla extract
1 tsp salt
180g chopped dark chocolate – I generally used Cadbury’s Bourneville
Maldon salt

Preheat the oven to 160 C. Butter a square or rectangular cake tin (20cm x 20cm is the classic size for this recipe, although I prefer a slightly bigger and more rectangular tin) and line with baking parchment, enough so that the parchment hangs over the sides of the pan and can be used to lift the finished brownies out of the pan. Butter the parchment and dust with cocoa powder and set aside.

In a medium-sized bowl, combine the cocoa powder, baking soda and half of the melted butter and stir to combine. Add the boiling water and stir until thick. Add the remaining butter, sugars and eggs, and beat for about two minutes till smooth and glossy. Add the remaining ingredients and stir until just combined, taking care not to over-mix – it’s fine to leave a few streaks of flour.

Pour the batter into the prepared pan and bake for 30 to 45 minutes – the smaller the pan and the thicker your brownies, the longer they’ll take. The brownies are done when they’re starting to pull away from the sides of the pan a little, but still seem gooey and under-baked in the centre. It’s important not to over-bake the brownies, as they’ll end up dry, so don’t be afraid to take them out of the oven when they still seem a bit raw. Remember, they’ll continue cooking and setting as they cool.

(Tip: if you become distracted and over-bake your brownies, fill a larger pan than your brownie pan with some cold water and lots of ice cubes. Gently place the brownie pan into the ice and water, which will cool the brownies down quickly so they don’t keep cooking as they cool.)

Allow to cool for about an hour before lifting out of the pan and cutting up into squares.

These brownies keep well, covered, for up to five days.

Sunday, January 1, 2012

A Christmas retrospective


Dark chocolate tart

Miniature caramelized onion tartlets

Blue cheese and walnut shortbread with caramelized pear
and crisped Parma ham

Pulled pork tostadas with pineapple and avocado
with sour cream and fresh coriander

Banana and blueberry wholewheat muffins
with yoghurt-maple topping

Homemade mince pies

Assorted frosted Christmas cookies

Dark chocolate Christmas-spiced tart with gingersnnap crust

Lemon-mascarpone asparagus tartlets

Chevin and ed grape salsa bruschetta

Mini pavlovas with sweetened creme fraiche and berries


Monday, November 21, 2011

Recently produced by munch

Salted caramel and hazelnut chocolates with Maldon salt sprinkles

Chocolates cut open

An enormous 50th birthday cake - the photo doesn't do it justice,
 it really was very big.

Inside, the cake was made up of three layers of lemon cake
with vanilla buttercream

Plum and almond cakelets

Miniature caramelized baby onion tarte tatins
with lightly dressed micro greens

Chinese spring onion pancakes
topped with slow-roasted duck in plum sauce

Crostini topped with chevin and red grape salsa

Sweet corn crumpets topped with cinnamon and star anise cured salmon,
beetroot and cranberry relish and dill

Panforte nero logs dusted with powdered sugar

Maple, sage and smoked paprika roasted nuts

Monday, October 17, 2011

Springtime high tea

Recently, Munch put together a springtime high tea.


Dark chocolate cupcakes with fresh strawberry buttercream, vanilla cupcakes with
chocolate buttercream, and toasted coconut cupcakes with cream cheese frosting

Miniature scones with homemade strawberry preserves and double thick cream

Roasted baby tomatoes and feta on toasted baguette slices

Smoked salmon and horseradish-spiked creme fraiche on sweetcorn crumpets
with wild rocket

Vanilla angel food cake with sweetened mascarpone and fresh berries
(the cake really is there, underneath all those berries)

Rare roast beef, watercress and wholegrain mustard on baby Yorkshire puddings

Here you can see a little bit of the cake peeking out between all the berries and mascarpone


Angel food cake recipe coming soon!

Wednesday, August 31, 2011

Danish recipe


Finally, the promised Danish recipe. The rolling out process is a little difficult to describe, so I’ve taken step-by-step photos to illustrate. Because of the photos and an extra recipe for the filling, this post is very long, making it seem complicated. It’s really not complicated at all, though it does take a long time from start to finish. But since much of the time is spent waiting for the dough to rest, you can get on with other things while you’re making the dough and assembling the danishes. And I promise, the feelings of satisfaction and accomplishment when you finally pull a tray of golden steaming danishes out of the oven, along with the 100% fresh, soft-crunchy pastries themselves, is ample reward for the time and effort involved.

Making the dough

Danish dough
Makes enough dough for 12 large pastries. I made 10 enormous ones because I’m greedy.
I’ve written this recipe to be made using a stand mixer. You can definitely mix and knead the dough by hand, it will just take a bit more time and effort.

7g instant yeast
½ cup milk, warmed to body temperature
¾ cup water, warmed to body temperature, plus more if needed
1 egg yolk
4 cups cake flour
¼ cup sugar
1 tsp salt
½ tsp ground cardamom (optional)
225g cold butter
More flour, for dusting and rolling

Place the yeast, water and milk in the bowl of a stand mixer fitted with a dough hook, and mix on medium speed until the yeast is dissolved. Add the egg yolk and mix to incorporate.

Sift the flour, sugar, salt and cardamom together and add to the yeast mixture. Mix on medium until just combined. I find that I usually need to add a little more water at this point to make the dough come together into a ball – just a little though, no more than ¼ cup. Once the dough has come together and formed a ball, increase the speed to high and leave for two to five minutes. The dough should be perfectly soft and smooth, with very little stickiness. Remove from the bowl, cover in clingwrap and refrigerate for fifteen minutes.

While the dough rests, dust a cool kitchen surface with flour and place the butter on the surface. Dust the butter with flour, too. Like so:


Use a rolling pin to beat the butter flat, and roll it out into a square. Squish together any bits of butter that break off.


Now push the butter aside and dust the surface with flour again. Remove the dough from the fridge and place it on the floured surface, dusting the dough with flour too.


Roll out to at least twice the size of the square of butter.

Dust the flour off the dough with a brush once it's rolled out

Place the butter in the centre of the rolled out dough.


Fold the dough over the butter like this:


Press the folded edges down to seal them, and then roll the dough out.


Now fold the dough like this:

Make sure to dust the flour off each folded bit as you fold


As you can see, some of the butter broke through my dough in the bottom right corner. This isn’t meant to happen, but as long as all the butter doesn’t break through and melt everywhere, it won’t affect your final product at all. Wrap the folded dough in clingwrap and refrigerate for 25 minutes.

Now, you repeat the rolling, folding and resting process described above three more times. So that means, you’re going to remove the dough from the fridge, roll it, and fold it; and again; and again. Every time you remove the dough from the fridge to roll again, make sure your surface is well-dusted with flour, and also – this is important! – lay the dough down before rolling so that the “open” seam side is facing your body. Like this:


And...
Roll, fold, rest.
Roll, fold, rest.
Roll, fold, rest.

And that’s it! Your dough is now ready to be rolled out one final time and turned into danishes.

Making the fillings

Now, the fillings. I made two kinds of danishes – custard and sour cherry, and chocolate. For the chocolate danish, I just used squares of plain dark chocolate. It was obviously good – when is buttery pastry combined with chocolate not going to be good? – but next time I’d use a thick, pipe-able ganache instead.

For the custard and sour cherry danishes, I cheated a little. I made my own custard, but bought jarred sour cherries in syrup and just thickened the syrup with a little cornstarch. You could use any fresh, frozen, or jarred berries or fruit to make a filling, or just use fresh berries. In my opinion, slightly tart berries or fruit work best (like the sour cherries used here, or cranberries, Cape gooseberries, plums, and so on).

Custard filling
Otherwise known as crème patisserie or pastry cream. Recipe makes about two cups.

1 ½ c milk
1 tsp vanilla extract
4 egg yolks
1/3 cup sugar
1/3 cup flour
1 tsp salt

Place the milk and vanilla extract in a medium pot over medium heat and warm to body temperature.

Meanwhile, in a medium-sized bowl, whish the egg yolks and sugar to combine, then add the flour and salt and whisk till smooth.

Add the warmed milk to the egg yolk mixture little by little, whisking all the while until all the milk has been added and the mixture is completely smooth. Return the mixture to the pot, place over medium heat. Stir the mixture constantly with a wire whisk as it warms up and thickens. When the custard becomes thick enough to be piped, continue whisking for another minute or two to make sure the raw flour taste has cooked out completely.

Remove from heat and cool, covered.

Assembling the danishes:


There are many different fillings you could use, as well as many different shapes you could fold your dough into. As mentioned, I chose a custard and sour cherry filling, and a dark chocolate filling, and demonstrate four different shapes.

First, roll the dough out to a thickness of 2mm to 5mm, and cut into equally sized squares or rectangles. The thickness of your dough and the size of your squares/rectangles depends on how many danishes you want to make, and how big or small they're going to be.


Trim the dough's edges with a sharp knife. This is important - sharply cut trimmed edges mean that the pastry will puff well in the oven.


Cut into squares or rectangles.


Now you can shape and fill.

First shape – my favourite, the pinwheel:


Then you pipe some custard onto the centre of the square, top the custard with some cherries and syrup, and fold like this:


Second shape – no idea what it’s called, let me know if you do:


Again, pipe custard onto the centre and top with cherries, and fold:

It looks messy (because it is messy) but it bakes up pretty

Third shape – again, no idea what the name is for this shape - you pipe the custard and place the cherries onto the uncut dough, and fold like this:

This one didn't hold up well in the oven, so not my favourite shape

Fourth shape – not really a shape at all, just an easy way out - roll the already cut dough a little more to make a longer rectangle:


And fold over, sealing the edges with a little beaten egg:


Now you're ready for the final step, baking.

Baking the danishes:

1 egg, beaten with some water
¼ cup smooth apricot jam
¼ cup water

Once you’ve filled and shaped the danishes, they have to rise for 30 to 40 minutes. Place the pastries on a baking slide and leave them in a warm, but not hot, place.

While they rise, preheat the oven to 200 C. Place the apricot jam and water in a small pot and bring to the boil, whisking to combine. Let the mixture boil for a few minutes to thicken a little. Remove from the heat.

The pastries are fully risen when the dough looks soft and puffy. Brush them with the egg and water mixture, and slide them into the hot oven. After ten minutes, turn the heat down to 175 C and bake for a further 8 – 10 minutes (check them after 8 minutes, and if they’re not deeply golden, leave them for a couple more minutes).

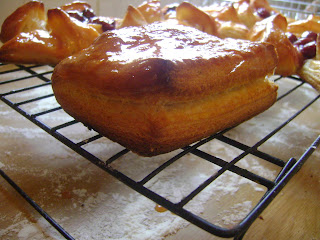
Remove from the oven and slide onto a wire cooling rack. Once the danishes have cooled for about ten minutes, brush them with the jam mixture – brush the pastry as well as the filling, so that it all looks shiny.

Giant danishes

And you’re done!

Eat me